elasticsearch学习四:elasticsearch集群
温馨提示:
本文最后更新于 2022年12月03日,已超过 997 天没有更新。若文章内的图片失效(无法正常加载),请留言反馈或直接联系我。
===
ES集群概念
elasticsearch集群就是由一个或多个节点组织在一起,它们共同持有整个的数据,并一起提供索引和搜索功能,一个elasticsearch集群由一个唯一的名字标识,默认为:"elasticsearch"
分片
ES索引可能存储超过1T的数据,但是一个节点可能只有500G的空间,这个时候,ES集群可以通过分片方案,将文档分别存储到多个节点中.
ES提供了将索引划分多份的能力,这些份就是"分片"
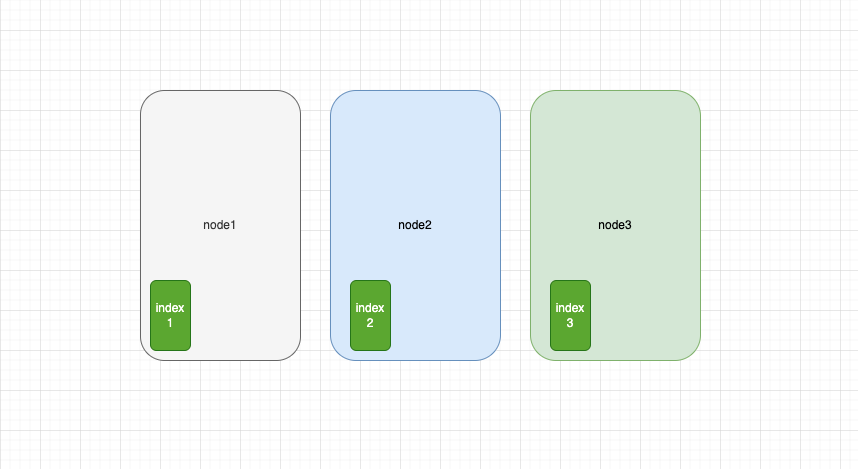
在图中,节点1,2,3分别存储了索引index的 分片1,2,3,假设这个时候node2节点宕机了,会出现什么情况呢?
当node2节点宕机了,index索引存储的3个分片将剩下2个,就会导致整个索引无法使用,ES集群无法再提供服务
复制
为了避免这个问题,ES创建分片的一份或者多份拷贝,这些拷贝叫做 "复制分片",或者直接叫"复制"
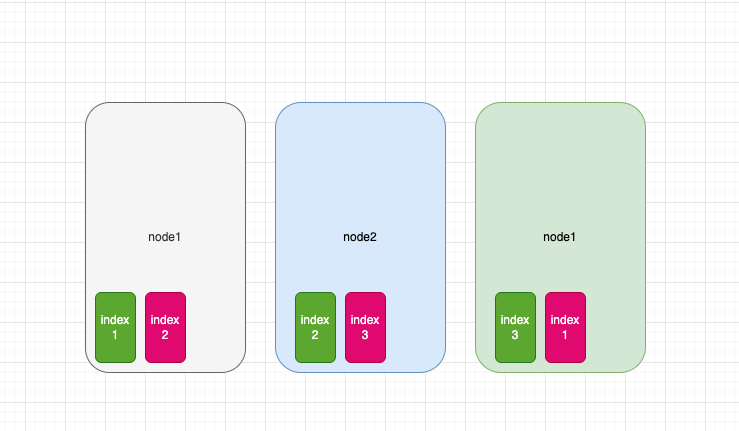
当node2节点宕机之后,在node1中的复制分片将可以提供服务
集群搭建
我们需要准备3台服务器安装docker,没有3台的可以直接单机起3个容器
docker pull elasticsearch:8.5.2
增加文件句柄数,在/etc/sysctl.conf 新增一行
vm.max_map_count=262144
sysctl -p
docker-compose文件:
version: '2.2'
services:
  es01:
    image: docker.elastic.co/elasticsearch/elasticsearch:8.5.2
    container_name: es01
    environment:
      - node.name=es01
      - cluster.name=es-docker-cluster
      - discovery.seed_hosts=es02,es03
      - cluster.initial_master_nodes=es01,es02,es03
      - bootstrap.memory_lock=true
      - xpack.security.enabled=false
      - xpack.security.transport.ssl.enabled=false
      - "ES_JAVA_OPTS=-Xms512m -Xmx512m"
    ulimits:
      memlock:
        soft: -1
        hard: -1
    volumes:
      - data01:/usr/share/elasticsearch/data
    ports:
      - 9200:9200
    networks:
      - elastic
  es02:
    image: docker.elastic.co/elasticsearch/elasticsearch:8.5.2
    container_name: es02
    environment:
      - node.name=es02
      - cluster.name=es-docker-cluster
      - discovery.seed_hosts=es01,es03
      - cluster.initial_master_nodes=es01,es02,es03
      - bootstrap.memory_lock=true
      - "ES_JAVA_OPTS=-Xms512m -Xmx512m"
      - xpack.security.enabled=false
      - xpack.security.transport.ssl.enabled=false
    ulimits:
      memlock:
        soft: -1
        hard: -1
    volumes:
      - data02:/usr/share/elasticsearch/data
    networks:
      - elastic
  es03:
    image: docker.elastic.co/elasticsearch/elasticsearch:8.5.2
    container_name: es03
    environment:
      - node.name=es03
      - cluster.name=es-docker-cluster
      - discovery.seed_hosts=es01,es02
      - cluster.initial_master_nodes=es01,es02,es03
      - bootstrap.memory_lock=true
      - xpack.security.enabled=false
      - xpack.security.transport.ssl.enabled=false
      - "ES_JAVA_OPTS=-Xms512m -Xmx512m"
    ulimits:
      memlock:
        soft: -1
        hard: -1
    volumes:
      - data03:/usr/share/elasticsearch/data
    networks:
      - elastic

volumes:
  data01:
    driver: local
  data02:
    driver: local
  data03:
    driver: local

networks:
  elastic:
    driver: bridge
运行docker-compose up -d即可
root@tioncico:~/elasticsearch# docker-compose up -d
root@tioncico:~/elasticsearch# docker ps
CONTAINER ID   IMAGE                                                 COMMAND                  CREATED          STATUS         PORTS                                                 NAMES
834e72d63235   docker.elastic.co/elasticsearch/elasticsearch:8.5.2   "/bin/tini -- /usr/l…"   12 seconds ago   Up 4 seconds   9200/tcp, 9300/tcp                                    es02
644bf94a5e48   docker.elastic.co/elasticsearch/elasticsearch:8.5.2   "/bin/tini -- /usr/l…"   12 seconds ago   Up 4 seconds   0.0.0.0:9200->9200/tcp, :::9200->9200/tcp, 9300/tcp   es01
8ae4ceab7226   docker.elastic.co/elasticsearch/elasticsearch:8.5.2   "/bin/tini -- /usr/l…"   12 seconds ago   Up 4 seconds   9200/tcp, 9300/tcp                                    es03
root@tioncico:~/elasticsearch#
如果运行失败的话,可以通过 docker logs es01 查看失败日志
节点测试:
root@tioncico:~/elasticsearch# curl -X PUT 127.0.0.1:9200/test
{"acknowledged":true,"shards_acknowledged":true,"index":"test"}
正文到此结束
- 本文标签: 服务架构
- 本文链接: https://www.php20.cn/article/403
- 版权声明: 本文由仙士可原创发布,转载请遵循《署名-非商业性使用-相同方式共享 4.0 国际 (CC BY-NC-SA 4.0)》许可协议授权

