springboot整合mybatis
温馨提示:
本文最后更新于 2021年04月07日,已超过 1,906 天没有更新。若文章内的图片失效(无法正常加载),请留言反馈或直接联系我。
新增mybaits的依赖
在 pom.xml中新增 mybatis 和mysql 的依赖,并使用maven 进行同步下载依赖:
<dependency>
    <groupId>org.mybatis.spring.boot</groupId>
    <artifactId>mybatis-spring-boot-starter</artifactId>
    <version>2.1.4</version>
</dependency>


<dependency>
    <groupId>mysql</groupId>
    <artifactId>mysql-connector-java</artifactId>
</dependency>
新增配置项
在application.properties文件中新增mysql和mybaits的配置项:
server.port=9090

# 扫描mapper xml配置项
mybatis.mapper-locations=classpath:mapper/*Mapper.xml
# 自动填装entity
mybatis.type-aliases-package=com.example.entity

spring.datasource.username=root
spring.datasource.password=123456
spring.datasource.url=jdbc:mysql://127.0.0.1:3306/test?useUnicode=true&characterEncoding=utf-8&useSSL=true&serverTimezone=UTC
spring.datasource.driver-class-name=com.mysql.cj.jdbc.Driver
注意,mysql8 只能使用com.mysql.cj.jdbc.Driver.
新增测试表:
CREATE TABLE \`user_list\` (
  \`id\` int(32) NOT NULL AUTO_INCREMENT,
  \`userName\` varchar(32) NOT NULL,
  \`passWord\` varchar(50) NOT NULL,
  \`realName\` varchar(32) DEFAULT NULL,
  PRIMARY KEY (\`id\`)
) ENGINE=InnoDB  DEFAULT CHARSET=utf8;
新增相关类:
controller 控制器,用于接收数据并调用servie响应,
entity 实体类,每一条数据都会对应成一个相应的类,
mapper, 映射接口,用于定义映射数据的sql语句操作
service,服务层,用于实现接口的方法.
controller:
package com.example.tioncico.controller;

import com.example.tioncico.entity.User;
import com.example.tioncico.service.UserService;
import org.springframework.beans.factory.annotation.Autowired;
import org.springframework.web.bind.annotation.PathVariable;
import org.springframework.web.bind.annotation.RequestMapping;
import org.springframework.web.bind.annotation.RestController;

@RestController
@RequestMapping("/user")
public class UserController {

    @Autowired
    private UserService userService;

    @RequestMapping("get/{id}")
    public User get(@PathVariable int id){
        return userService.get(id);
    }
}
service:
package com.example.tioncico.service;

import com.example.tioncico.entity.User;
import com.example.tioncico.mapper.UserMapper;
import org.springframework.beans.factory.annotation.Autowired;
import org.springframework.stereotype.Service;

@Service
public class UserService {
    @Autowired
    UserMapper userMapper;
    public User get(int id){
        return  userMapper.get(id);
    }
}
entity:
package com.example.tioncico.entity;

public class User {
    private Integer id;
    private String userName;
    private String passWord;
    private String realName;

    public Integer getId() {
        return id;
    }

    public void setId(Integer id) {
        this.id = id;
    }

    public String getUserName() {
        return userName;
    }

    public void setUserName(String userName) {
        this.userName = userName;
    }

    public String getPassWord() {
        return passWord;
    }

    public void setPassWord(String passWord) {
        this.passWord = passWord;
    }

    public String getRealName() {
        return realName;
    }

    public void setRealName(String realName) {
        this.realName = realName;
    }

    @Override
    public String toString() {
        return "User{" +
                "id=" + id +
                ", userName='" + userName + '\'' +
                ", passWord='" + passWord + '\'' +
                ", realName='" + realName + '\'' +
                '}';
    }
}
mapper:
package com.example.tioncico.mapper;

import com.example.tioncico.entity.User;
import org.springframework.stereotype.Repository;

@Repository
public interface UserMapper {
    User get(int id);
}
启动类注入mapper扫描配置:
package com.example.tioncico;

import org.mybatis.spring.annotation.MapperScan;
import org.springframework.boot.SpringApplication;
import org.springframework.boot.autoconfigure.SpringBootApplication;
import org.springframework.boot.builder.SpringApplicationBuilder;
import org.springframework.boot.web.servlet.support.SpringBootServletInitializer;

//springboot 应用启动类的标识
@SpringBootApplication
//继承SpringBootServletInitializer 用于springboot内部启动tomcat,并且可自定义端口号,项目名
@MapperScan("com.example.tioncico.mapper")
//扫描mapper类
public class TioncicoApplication extends SpringBootServletInitializer {

    public static void main(String[] args) {
        SpringApplication.run(TioncicoApplication.class, args);
    }

    @Override
    protected SpringApplicationBuilder configure(SpringApplicationBuilder builder) {
        return builder.sources(this.getClass());
    }
}
在resources文件夹中新增mapper.xml配置项:
注意要和 application.properties在 mybatis.mapper-location 的配置项一致
<?xml version="1.0" encoding="UTF-8"?>
<!DOCTYPE mapper PUBLIC "-//mybatis.org//DTD Mapper 3.0//EN" "http://mybatis.org/dtd/mybatis-3-mapper.dtd">
<mapper namespace="com.example.tioncico.mapper.UserMapper">

    <resultMap id="BaseResultMap" type="com.example.tioncico.entity.User">
        <result column="id" jdbcType="INTEGER" property="id" />
        <result column="userName" jdbcType="VARCHAR" property="userName" />
        <result column="passWord" jdbcType="VARCHAR" property="passWord" />
        <result column="realName" jdbcType="VARCHAR" property="realName" />
    </resultMap>

    <select id="get" resultType="com.example.tioncico.entity.User">
        select * from user_list where id = #{id}
    </select>

</mapper>
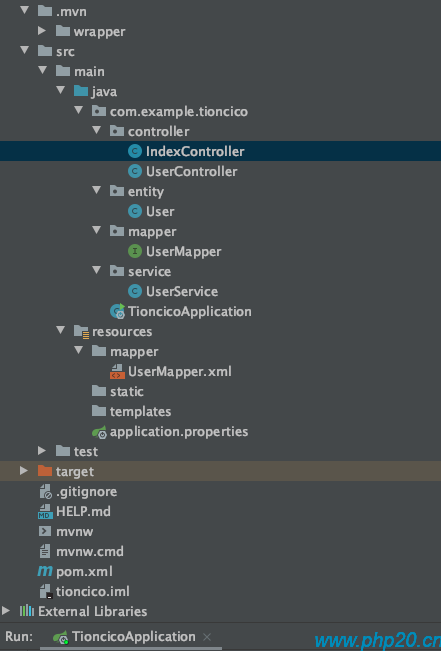
项目结构为:

新增一条数据插入到表中:
INSERT INTO user_list (\`id\`,\`userName\`,\`passWord\`,\`realName\`)VALUES(1,"仙士可","123456","666");
访问
http://127.0.0.1:9090/user/get/1
即可看到输出:

注解 sql 语句实现sql操作
package com.example.tioncico.mapper;

import com.example.tioncico.entity.User;
import org.apache.ibatis.annotations.*;
import org.springframework.stereotype.Repository;

import java.util.List;

@Repository
public interface UserMapper {

//    @Select("select *  from user_list where id=#{id}")
    User get(int id);

    @Insert({"insert into user_list(userName,passWord,realName) values(#{userName},#{passWord},#{realName})"})
    @SelectKey(statement = "select last_insert_id()", keyProperty = "id", before = false, resultType = Integer.class)
    Integer add(User user);

    @Select("select * from user_list where userName like concat('%',#{userName},'%')")
    List <User> getListByUserName(String userName);

    @Update("update user_list set userName=#{userName},passWord=#{passWord},realName=#{realName} where id=#{id}")
    Integer update(User user);

    @Delete("delete from user_list where id = #{id}")
    Integer delete(int id);
}
正文到此结束
- 本文标签: 编程语言
- 本文链接: https://www.php20.cn/article/283
- 版权声明: 本文由仙士可原创发布,转载请遵循《署名-非商业性使用-相同方式共享 4.0 国际 (CC BY-NC-SA 4.0)》许可协议授权
热门推荐

相关文章
近期评论
-
来自: 留言板
-
来自: 如何策划一个模拟经营类的文字游戏
-
来自: 留言板
-
来自: 留言板
-
来自: 留言板
