openresty搭建网站防火墙
温馨提示:
本文最后更新于 2020年11月23日,已超过 2,044 天没有更新。若文章内的图片失效(无法正常加载),请留言反馈或直接联系我。
在上一篇文章(diy 你的nginx-OpenResty)中,已经提到了如何安装一个openresty,现在我们可以通过开源项目 https://github.com/loveshell/ngx_lua_waf
实现一个简单的防火墙,例如:

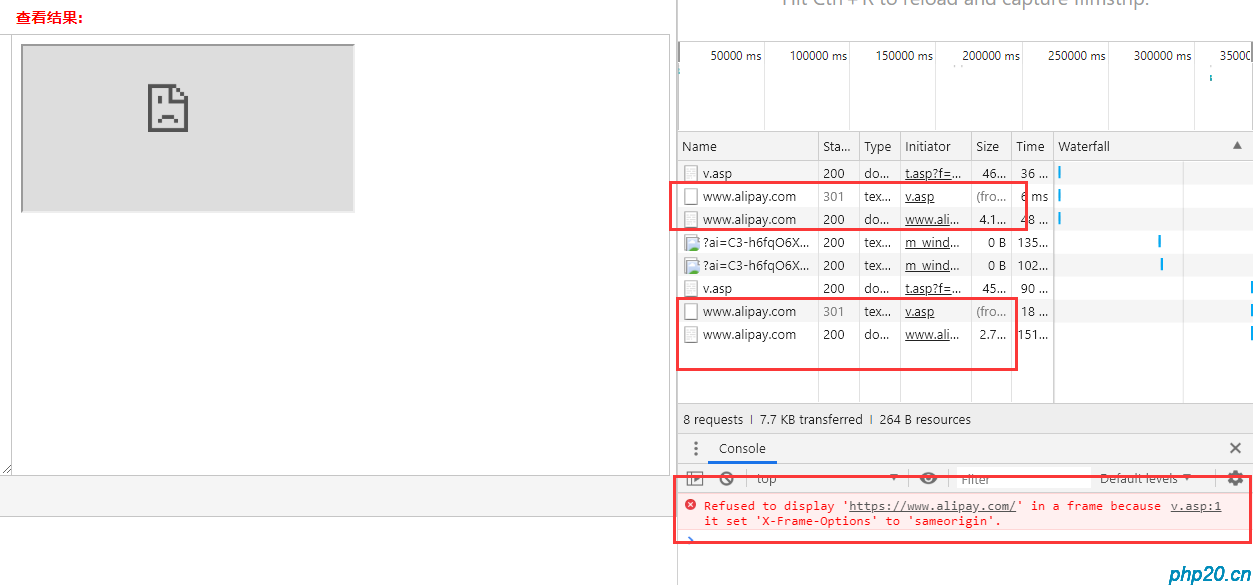
当我提交一个 select * from 疑似 sql注入的参数时,则会直接被拦截
下载waf配置:
wget https://github.com/loveshell/ngx_lua_waf/archive/v0.7.2.tar.gz
解压文件并将
./config.lua,
./init.lua,
./waf.lua,
./wafconf/*
文件移动到你的项目目录
例如在上篇文章中的openrestyTest/config 目录:
[root@tioncico-server openrestyTest]# tree
.
├── client_body_temp
├── conf
│   ├── nginx.conf
│   └── waf
│       ├── config.lua
│       ├── init.lua
│       ├── wafconf
│       │   ├── args
│       │   ├── cookie
│       │   ├── post
│       │   ├── url
│       │   ├── user-agent
│       │   └── whiteurl
│       └── waf.lua
├── index.php
├── logs
│   ├── access.log
│   ├── error.log
│   └── hack
│       └── xxx.easyswoole.cn_2020-11-23_sec.log
新增./log/hack/目录,并且将 ./conf/waf/config.lua里面的RulePath,logdir路径修改为正确路径

在nginx.conf中的http块中新增代码:
lua_package_path "/usr/local/openresty/lualib/?.lua;/www/wwwroot/homeTest/openrestyTest/conf/waf/?.lua";
lua_shared_dict limit 10m;
access_by_lua_file /www/wwwroot/homeTest/openrestyTest/conf/waf/waf.lua;
init_by_lua_file  /www/wwwroot/homeTest/openrestyTest/conf/waf/init.lua;
注意:lua_package_path,必须引入openresty安装目录的lualib,然后增加一个分号,引入当前项目的waf/?.lua,否则将会报错:
nginx: [alert] failed to load the 'resty.core' module (https://github.com/openresty/lua-resty-core); ensure you are using an OpenResty release from https://openresty.org/en/download.html (reason: module 'resty.core' not found:
直接启动项目,在项目后面增加: ?id=select%20*%20from%20information_schema
即可触发waf防护
正文到此结束
- 本文标签: 服务架构
- 本文链接: https://www.php20.cn/article/257
- 版权声明: 本文由仙士可原创发布,转载请遵循《署名-非商业性使用-相同方式共享 4.0 国际 (CC BY-NC-SA 4.0)》许可协议授权
热门推荐

相关文章
近期评论
-
来自: 留言板
-
来自: 如何策划一个模拟经营类的文字游戏
-
来自: 留言板
-
来自: 留言板
-
来自: 留言板
